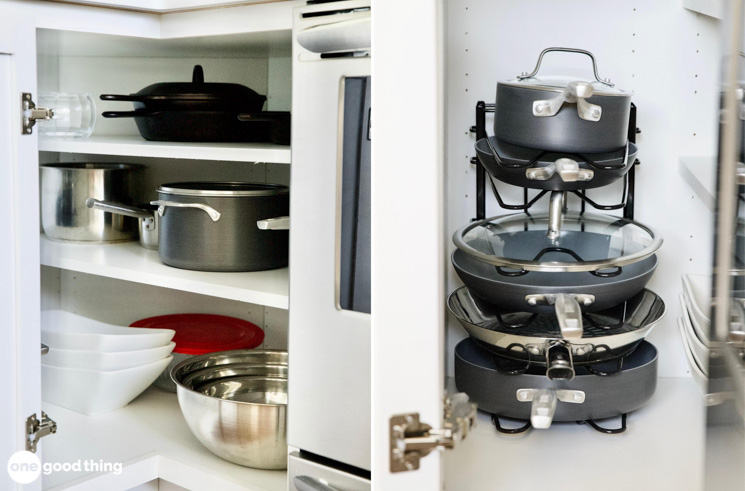
Does anyone else have a “pots and pans cabinet” that drives them crazy? I know I can’t be the only one who regularly fights to get their cookware in and out of that disaster zone of a cabinet.
For those of us who do struggle with our perpetually disorganized pots and pans cabinets, I have some good news! You no longer have to suffer in silence, because today’s post is packed with easy fixes for this particular storage conundrum!
By the end of this post, you’ll have a simple 5-step plan of action for overhauling your cluttered pots and pans cabinet. You’ll also have learned about several useful organizers (of both the store-bought and DIY variety) you can use to keep your cookware looking neat and tidy!
If you know of any tips, tricks, or products that could help someone organize their kitchen cabinets, please share them with us in a comment at the bottom of this post! :-)
How To Organize Your Pots And Pans Cabinet

Step 1 – Empty It Out
Start by taking everything out of the cabinet. (Yep, all of it!) Take a quick inventory of what you have, and get rid of anything you don’t actually use.

Step 2 – Consider Other Options
Next, consider what’s left and whether or not you could store some of it elsewhere. Is there an empty stretch of wall nearby you can use, or is there room on the floor of your pantry?
Even if you’re only able to move one or two items to another location, it’ll free up valuable space in your pots and pans cabinet!

Step 3 – Clean & Prep
Since your cabinet is already empty, this is a great time to give it a thorough cleaning. I like to use my scented cleaning vinegar for this, along with a microfiber cloth to wipe out any dust or grime lurking in the corners.
Once the cabinet is clean, feel free to install some shelf liner if you feel so inclined. You can find non-adhesive shelf liners of all shapes, sizes, colors, and materials online, or you can make your own!

Step 4 – Accessorize
Adding a few organizational accessories to your cabinet can help you make the most of the space. Here are a few worth considering for your pots and pans cabinet:

Adjustable Pots and Pans Organizer
This adjustable rack can be configured in a dizzying number of different ways, allowing you to create a setup that works for your unique collection of cookware.

Adjustable Pan and Lid Rack
This organizer is a bit less customizable than the one above, but it’s a bit more aesthetically appealing and still features adjustable dividers.

Wall/Door Mount Lid Organizer
Mount this vertical organizer rack on a wall or on the inside of a cabinet door to hang up your lids and keep them out of the way.

3-Tier Corner Shelf Rack
If your cabinet is tucked into a corner, this simple corner shelf rack can help you make the most of your space!
Step 5 – Hack It
Finally, don’t forget about DIY! There are a number of useful DIY approaches and simple hacks you can incorporate into your reorganization efforts. Here are a few to consider:

Paper Plate Protection
If you are planning to stack your cookware, you can prevent them from scratching each other with a few thin paper plates. Just place a paper plate between each pot or pan to cushion the bottom and sides for scratch-free storage.

DIY Vertical Organizer
Storing baking sheets and other large items vertically can save you a lot of space, and you don’t even have to buy a vertical organizer to do it! Instead, make your own vertical organizer using a few tension rods or bungee cords.

Hang A Towel Bar
If there are a few pots and lids that just won’t fit in your cabinets, install a towel bar on a nearby stretch of wall instead. Then you can use a few simple S hooks to hang the pots and their lids from the bar for easy hanging storage!

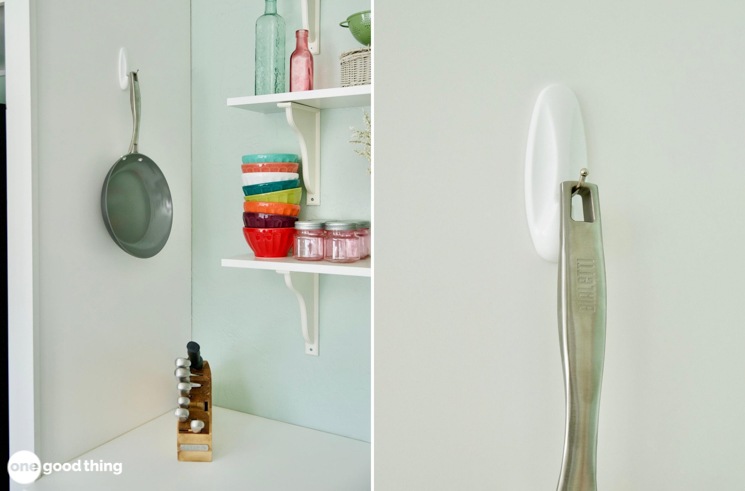
Add Hooks Anywhere
Adhesive Command hooks are a great way to utilize every inch of space available to you. Even a narrow nook between a cabinet and a wall can be used for storage with the help of a Command hook!

Flip Your Lid(s)
Another simple tip for stacking pots in a cabinet is to simply flip each pot’s lid upside-down. Not only does it keep the pots and their respective lids together, but the upside-down lid provides a flat(ish) surface so you can stack another pot on top.

Play With Pegboard
Hang some pegboard in your kitchen to do double-duty as a stylish visual feature and additional storage. Hang your pots and pans from hooks and outline them in marker or chalk so you never forget where each item is supposed to go.


I added pull-out shelves to cabinets in my kitchen, laundry, and linen closet. It is not a cheap option, but if you watch for sales you can save a lot. There are so many styles and brands to choose from. I chose Slide-A-Shelf brand (not affiliated with the company, just a happy customer). This brand has been around for some time, you can do a cabinet at a time as your budget allows. In my case no need to order custom sizes and pay full price, these come in small incremental sizes and the closest measurements were a perfect fit. I installed them myself and I’m not much of a DIY’er. Check their website for styles then watch the ‘net for sales, I found mine at a good sale price.
Please log in or create a free account to comment.You can also mount a hanging rack from the ceiling to hold your pots, pans and lids.
Please log in or create a free account to comment.Here is a really easy one for you. I have an inexpensive plastic coated, wire lid rack from Walmart. It looked like it was too high to work with my lids in the space I needed to put it in. Then like a bolt out of the blue, it hit me. My kitchen, my lid rack, my rules: I slightly bent the lid rack supports all in the same direction. Voila! Lids suddenly fit and the look is really cool. Bonus is that large spoons, etc. fit under the lids in my pull-out drawer. It has been several years now and the Kitchen Storage Police still have not shown up. Bottom line: Don’t be afraid to customize your storage tools to fit your own needs.
Please log in or create a free account to comment.Instead of using shelf paper or liner, I used leftover vinyl flooring and lined my cupboards and drawers. Easy to keep clean. Used little pieces of double sticky tape to keep in place and to prevent from curling. If you don’t have leftover vinyl, go to a flooring store for remnants cheap.L
Please log in or create a free account to comment.What does the bungee cord hook onto at the top?
Please log in or create a free account to comment.They would hook to the racks on the top and the bottom.
Please log in or create a free account to comment.One piece of rebar, held at each end by a heavy-duty ceiling screw eye, with S-hooks, will hold every pot and pan in your kitchen, overhead. For glass lids, I sunk screws into the wall on both sides of the stove, with only 1/8″ protrusion, perfect for holding every size glass lid. My kitchen is heavily used and very small.
Please log in or create a free account to comment.If a remodeled kitchen is in your future, replace those cabinets with drawers!
Please log in or create a free account to comment.It’s acually a great and helpful piece off info.
Please log in or create a free account to comment.I am satisfied that you jujst shared this helpful infodmation wifh us.
Please keep us informed like this. Thankjs for sharing.
For what ever reason unorganized cabinets have always made me crazy. Other aspects are my house can be unorganized–but not the cabinets. First thing I noticed was–you had too much stuff in there.. Good you moved some to another spot (so long as it isn’t some dreaded dark forgotten place that can get out of control). Better too that DH moved the shelf (mine were built in– so I cut them out & installed adjustable). Jillee please know that I am not picking on you–but only saying what I see. I see 2 bundt pans, 3 muffin tins, & 4 large cookie sheets –do you really use that many at once? My 5 pots that are used over & over again hang on the wall near the stove. They take up 36″w x 12″ h of the back splash area. They are right where I need them. Their lids are in a drawer–in your case though I would probably use the roaster to hold them. The two larger pots are in the cabinet– the pasta pot has it colander and specialized draining lid (inverted) & nestled inside. The three skillets XL, MD & SM are nestled .
Please log in or create a free account to comment.One thing that is bugging me–what do the lids on the door go to?
I kinda have my own ABCD rule of thumb—At hand, the most used are kept the closest (my hanging pots), Byway, often used relatively close(the lids), Co-mingled, the nestled ones (skillets), Dreaded–the overflow area (dark forgotten place where the home canning stuff is).
I mean all this in the best way–sorry if I seem preachy.
Another trick I had just learned is using small tension rods horizontally for your cookie sheets. :)
Please log in or create a free account to comment.Totally off subject but… I noticed the Pampered Chef pots with the hard water stains.(: o sorry) I have had the same issue! I have moved and my new home THANKFULLY has not got the same hard water problems, anyway we could get a One Good way to get rid once and for all of the stains?!? Oh pretty please : ) BTW… Your after picture is totally inspiring and I felt an amazing sense of peace when I looked at it after the many mashed toes of days gone bye!
Please log in or create a free account to comment.Your solutions make me smile. You are very neat! Thanks a bunch.
Please log in or create a free account to comment.Am I missing something? I clicked on the story to see the after pictures and all i can get to are the comments, that seems to happen on any of the topics here, do I have to be a member or pay or something?
Please log in or create a free account to comment.